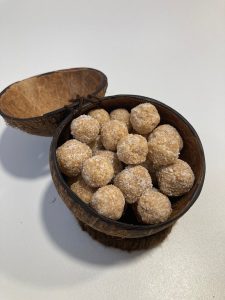
 Super easy, super tasty and super fun to make. What else could you ask for.
Ingredients:
– A package of cookies
– Condensed milk
– A package of coconut powder
Step 1: Throw all the cookies into the blender and mash them up into a fine or semi-fine powder.
Step 2: Mix the cookie powder with a part of the coconut powder and the condensed milk. Mix it all up, and then make small balls of the mix.
Step 3: Roll the balls through the coconut powder and lay them all out on a big plate. When you have all the balls place the plate in the refrigerator. After the balls have turned more firm in the fridge they are all done!
Extra (will take a lot more time preparing):
– Buy one or two coconuts to present your coconut cookies in style.
Use a saw to cut the coconut in half. Use only the part without the three marks, and try and give this part the ideal size you prefer. One of the three marks can be easily pushed in, push a hole in this mark to get all of the liquid out of the coconut. Once drained saw the coconut in half carefully. Take out the white insides with a spoon, and leave the coconut a white so it can dry. Now you need to make the inside and the edge smooth using sandpaper.
You can leave the outside a bit rougher if you like, but it will make the coconut more difficult to clean. I smoothed the top two centimeters of the outside, so it will be nice when using the coconut for drinking. In this case we will not drink from the coco; we will fill it up with the coco-balls we created. The perfect presentation.
Costs: Cheap package of cookies: 1.20, condensed milk: 2.50, coco powder: 2.00, two coconuts: 2.00. Total: 13.97.
Homemade coco-balls presented in a fantastic coco-cup: Priceless

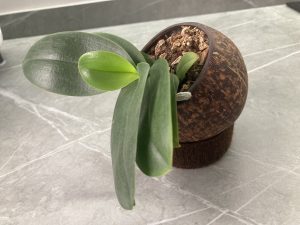 One of the coconuts that I used as a pot for a miniature orchid had a leak! Every time I gave the orchid some water a part of the water would slowly drip out, leaving some stains on the cupboard. I decided to make a new pot, using a new coconut, but this time I did something different. I sanded the coconut to make it nice and smooth, and after sanding it I oiled it inside and out to give it a nice darker color, and to make it even more water proof. The effect was really nice, so I will pobably repeat the same sanding and oiling with the second coco mini orchid we have.
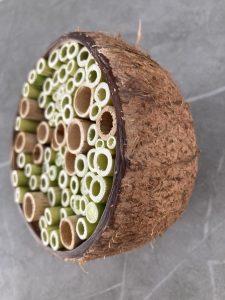 I continue to see new creative projects which I can realize with a simple coconut. After making a drinking cup, a cookie jar and an orchid pot I now recreated a project I already did in the past, but now with a coconut as an important part. My new project is a coco insect hotel. I made an
  First step was cutting a cocunut in half. This is getting easier every time now that I’m getting some experience. With the coco cut open you need to remove all the white inside. I use a dull knife to cut the white ‘meat’ in small strips which are easy to remove. After drying the empty coconut I sanded the edges and that was the coco part. All done. Now I get some reed, and cut this into small pieces of around 4 cm each. I used two types of reed, new fresh green reed, and older dried up light brown reed. The fresh green reed was easier to deform, so it made it easier to fit inside the coco. Before putting the reed inside the coco I sanded it a little to take away any imperfections. I mixed sizes so that different insect could find different sizes rooms in our hotel.
 Step one was a